Demo 9: Forms for Creating New Model Records
In this demonstration, I will show how to add controller actions and views that allow users to create new model records and save them to the database. We will continue to build upon the QuizMe project from the previous demos.
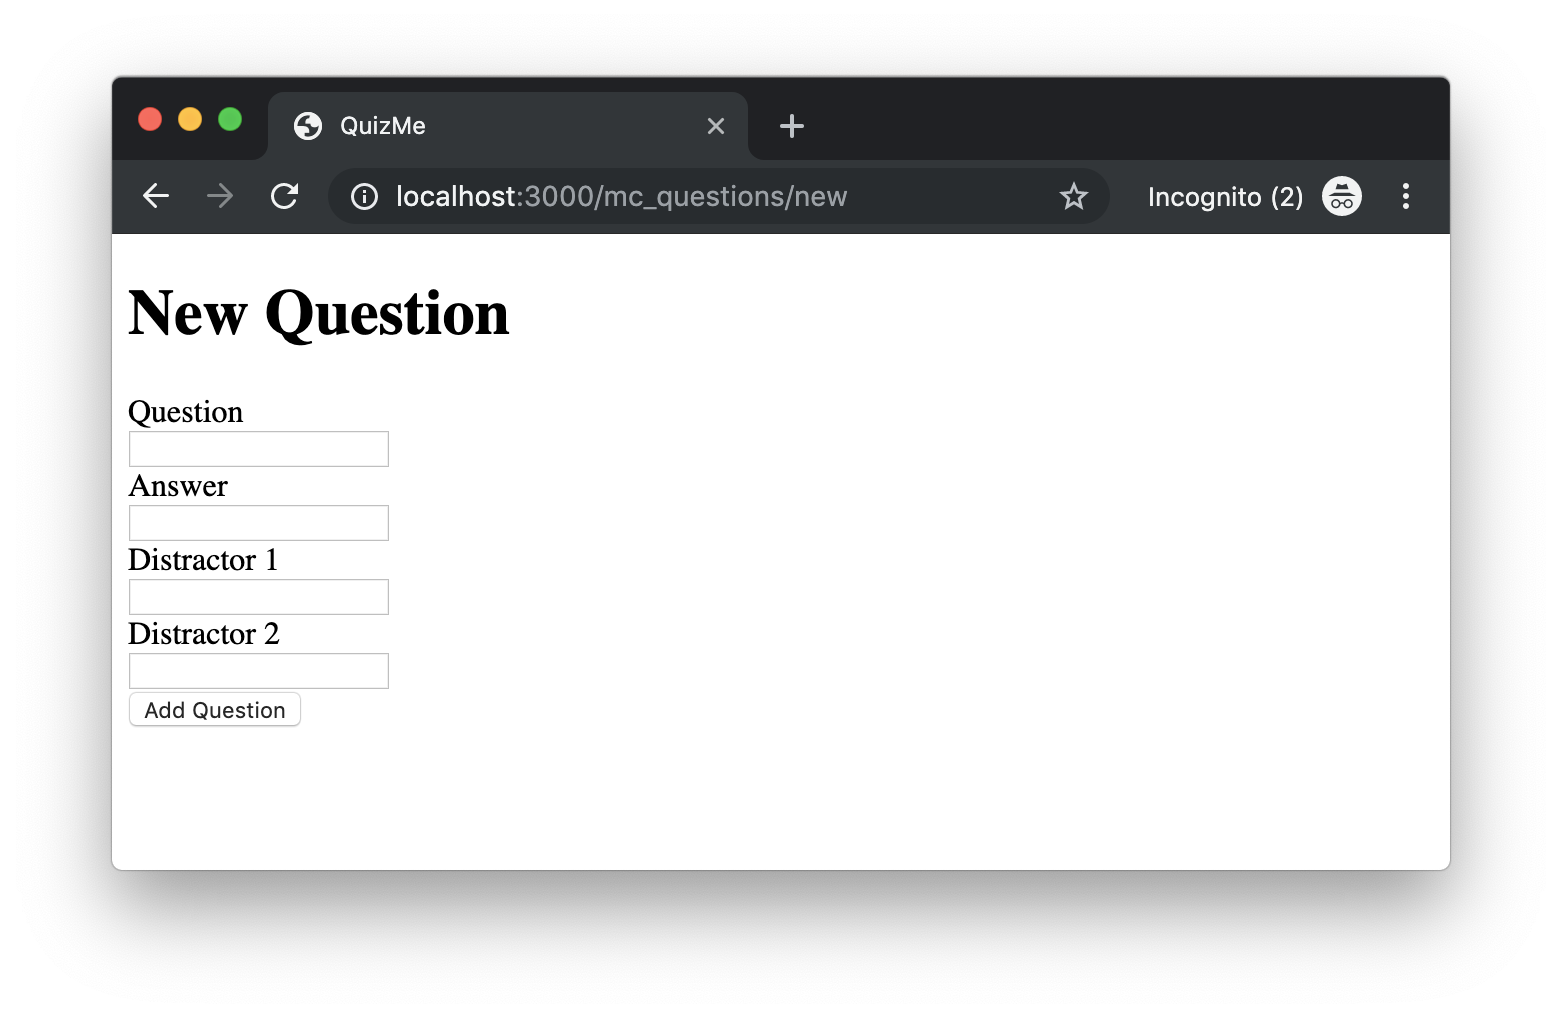
In particular, we will create a form for creating new multiple-choice questions, as shown in Figure 1.

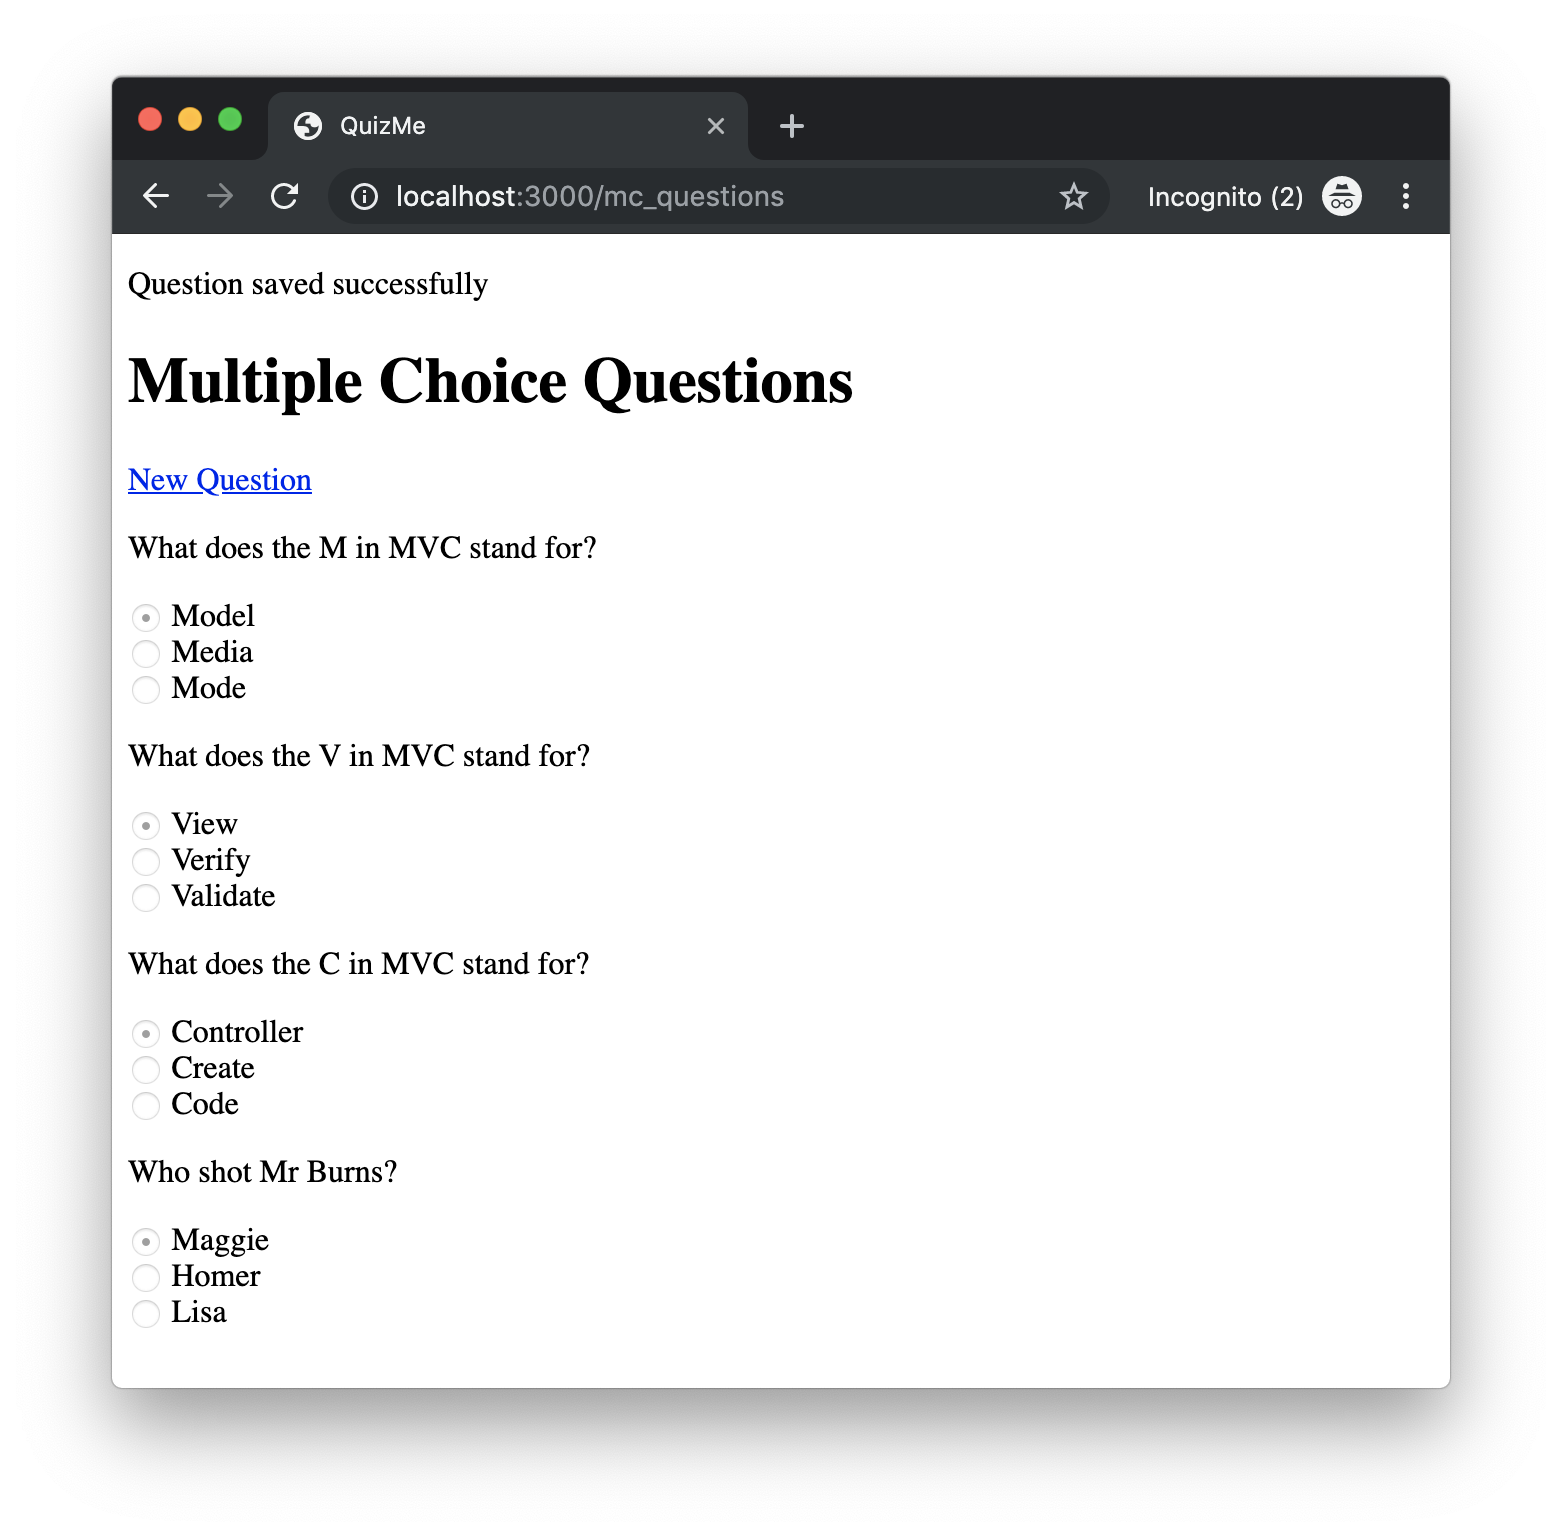
Successful submissions of the form will result in saving the specified question to the database, redirecting the browser to the index page for multiple-choice questions, and displaying a success notification at the top of the index page. For example, Figure 2 illustrates the results of submitting a new “Who shot Mr Burns?” question. Note the “Question saved successfully” notification at the top of the page and the new multiple-choice question that has been added to the set of three seed-data questions.

index page for multiple-choice questions; and (3) a success notification will be displayed at the top of the index page (see the "Question saved successfully" message).There will be two main parts to this demo. In the first part, we will refactor our code for displaying notification messages, so that it works better with the forms we will be creating in this and future demos. In the second part, we will implement the form page and the logic for processing form submissions.
1. Passing Notification Messages to the View with the Flash
In this part, we will refactor our existing notification-message code to work better with the new forms we will be implementing. It is common for modern web apps to display notification messages after the user performs certain operations. For example, if the user submits a form, a success notification might appear to let them know that the submission was successful. Similarly, if the form submission failed, an error notification might appear.
To implement such messages, Rails provides the flash. The flash is basically a hash that controllers and ERBs can read and write. The flash is part of the session, so the data stored in the flash is specific to a particular user session. What makes the flash special is that the saved data is available only for the next HTTP request of the session. When that request completes, the data is automatically deleted. (For more info on sessions and the flash, see this deets page.)
To demonstrate using the flash, let’s refactor the code we wrote for the feedback form’s status message. Instead of passing the status message to the view as a local variable, we can put the message in the flash hash under the key :status_msg, like this:
-
In the
leave_feedbackmethod ofStaticPagesController, remove the status message from thelocalshash, and add the status message to theflashhash, like this:respond_to do |format| format.html { flash.now[:status_msg] = form_status_msg render :contact, locals: { feedback: params } } endNote that in this example we use
flash.now, because we want the flash notification to be available during the current request (and not the next one). -
In the
contact.html.erbview, replace the current code for displaying the status message with the following code that displays the status message using the flask:<% if flash.key? :status_msg %> <p><%= flash[:status_msg] %></p> <% end %>Submit the feedback form to see the flash message working.
Since it is common to display flash messages in a variety of different views, it makes the the most sense to put the above view code in a single place—namely, the
application.html.erblayout. In Rails, when a controller action renders a view, that view is implicitly wrapped in the default layout,application.html.erb, found inapp/views/layouts. This layout contains the<html>,<head>,<body>, etc. tags required for all HTML pages. View code we write, such asshow.html.erb, is actually rendered inside theapplication.html.erblayout. A<%= yield %>statement withinapplication.html.erbspecifies where the view code is inserted. To move the code for displaying flash messages to theapplication.html.erblayout, we do as follows. -
Display all flash messages (if there are any) on any given page by inserting the following code above the
<%= yield %>inapplication.html.erb, like this:<% flash.each do |key, message| %> <p><%= message %></p> <% end %> -
Remove the now redundant flash message displaying code in the
contact.html.erbview.You should be able to run the app and see that the notification messages are still working.
2. Creating New Model Records with a Form
Previously, we have seen only how to save new the records to the database by using the seeds.rb file; however, we also want users to be able to create, update, and delete records. In this part, we will implement a form that enables users to create new multiple-choice questions.
Recall that the most straightforward way to enable a user to pass data to the server is via a form. Also, remember that a form page requires two controller actions: one to display the form and one to process the form submission. Following the RESTful architectural style (widely considered a best practice), the two (semi-standard) actions for creating new model records are new and create. The new action renders the page containing the form, and the create action processes the form submission, attempts to save the new object in the database, and performs error handling if the object cannot be saved.
2.1. Rendering the Form with the new Action
First, let’s create the new action to render the form page depicted in Figure 1:
-
In the
McQuestionsController, add anewaction that will render the standard corresponding view and pass an emptyMcQuestionobject to use in the form, like this:def new question = McQuestion.new respond_to do |format| format.html { render :new, locals: { question: question } } end end -
Also add an empty placeholder
createaction, like this:def create # TODO end -
Add to
routes.rbthe standard resource routes for thesenewandcreateactions. Insert them in between theindexandshowroutes, like this:# index route get 'mc_questions/new', to: 'mc_questions#new', as: 'new_mc_question' # new post 'mc_questions', to: 'mc_questions#create' # create # show routePay attention to the order of the routes! If the new route were to be inserted after the
showroute, requests to http://localhost:3000/mc_questions/new would incorrectly match with theshowroute, because theshowroute would think thenewpart of the path is anid, which is wrong, of course, and would lead to lots of potentially confusing downstream errors. -
Create the
new.html.erbfile underapp/views/mc_questions, like this:<h1>New Question</h1> <%= form_with url: mc_questions_path, method: :post, local: true do %> <% end %>Using the above options for the
form_withhelper should be familiar to you from the feedback form we added previously. However, unlike the feedback form, this form will use a model object, so we need to add amodeloption that specifies the object and ascopeoption that groups all the model form data under a single key in theparamshash. -
Add the
modelandscopeoptions, like this:<%= form_with model: question, url: mc_questions_path, method: :post, local: true, scope: :mc_question do %> -
Another change from the feedback form is that we will use the model form field helpers instead of the form tag helpers. To use the new helpers, we need to add a local variable to the form block called
form, like this:<%= form_with model: question, url: mc_questions_path, method: :post, local: true, scope: :mc_question do |form| %> -
Add text fields to the form for each of the
McQuestionattributes, like this:<div> <%= form.label :question %><br> <%= form.text_field :question %> </div>Note how the form labels and fields are now being created by calls to methods of the
formobject, instead of using, for example, thelabel_tagandtext_field_taghelpers we had seen previously. -
Add the submit button as follows:
<%= form.submit "Add Question" %>You can now visit http://localhost:3000/mc_questions/new to see the form display, but submitting it won’t do anything yet.
-
As a final step for this part, add a link to the
newquestion page under theindexpage heading, so users have a way of getting to the form, like this:<%= link_to 'New Question', new_mc_question_path %>
2.2. Processing Form Data with the create Action
Now let’s add the logic to the create action. The action will need to retrieve the form data for a question from the params hash, create a new McQuestion object based on the form data, and save the object to the database. We will perform a redirect action if it saves correctly, or render the form again with an error message if the save fails.
-
First, rough in some psuedocode to clarify what’s needed, like this:
def create # new object from params # respond_to block # if question saves # redirect to index # else # render new end -
Create the new
McQuestionobject based theparamshash, like this:# new object from params question = McQuestion.new(params.require(:mc_question).permit(:question, :answer, :distractor_1, :distractor_2))Data from the
paramshash isn’t necessarily safe. Any data received from a POST request could have been tampered with or fabricated, and new keys could have been added that were not on the original form, all in an attempt to exploit latent bugs in the app. Since we know that the form should contain onlyMcQuestionattribute data (i.e.,question,answer, etc.) and that those data are scoped under the top-level:mc_questionkey, we can require that the:mc_questionkey must exist in theparamshash and that only the specified attributes are allowed. (We will still have to be careful, though, because malicious data may have been submitted for those attributes.) -
Begin to respond to the request and attempt to save the new model object by beginning to flesh out the
respond_toblock, like this:# respond_to block respond_to do |format| # html format block format.html { if question.save # success message # redirect to index else # error message # render new end } endNote that this code embeds the call to
savein anifstatement that will behave differently (see theifversuselselogic), depending on whether or not the save is successful. -
On a successful save, insert a success message in the
flashhash and preform an HTTP redirect to theindexpage, like this:# success message flash[:success] = "Question saved successfully" # redirect to index redirect_to mc_questions_url -
On a failed save, add an error message to the flash using
flash.now, and render thenewform, so the user can try again, like this:# error message flash.now[:error] = "Error: Question could not be saved" # render new render :new, locals: { question: question }
Users should be able to create new questions using the form!